Weekly Hands-on How-To powered by KnowHow
How to Address Common Water Mitigation Problems

Every water mitigation project comes with its own set of surprises. When you arrive on-site, it can sometimes feel like spinning the wheel of fortune—will you uncover unexpected mold, a stubborn leak, or an uncooperative homeowner? You never know, but being aware of these potential issues ahead of time can make them much more manageable.
In this weekly how-to, powered by KnowHow, we’ll discuss the most common issues you will encounter throughout a water damage mitigation job and the strategies you need to stay ahead of the game. This guide will help you get familiar with these challenges and how to address them before they catch you off guard on your next job.
So, let’s dive into these common problems and learn how to tackle them confidently.
Note: This Weekly Hands-On How-To was based on this template in KnowHow’s template library.
Issue #1: Mold Discovered During Water Mitigation
Mold thrives in moist environments, so it’s no surprise that it’s one of the most common issues you’ll encounter when arriving at a water-damaged site. Mold can start growing within a day or two of water exposure, often hiding behind walls, under flooring, or within other materials. It can spread rapidly if left unchecked, posing health risks and further complicating the mitigation process.
Steps to Address:
- Alert the Homeowner and Management: Inform the homeowner about the mold discovery and explain the need to contain the area to prevent further spread.
- Assess the Extent of Mold Growth: Thoroughly inspect the area to gauge the size and scope of the mold problem. Look for visible signs like discoloration and that telltale musty smell.
- Suit Up with PPE: Gear up with gloves, goggles, a respirator, and protective clothing to safeguard against mold spores.
- Contain the Mold: Use plastic sheeting and tape to create a containment barrier to isolate the affected area and prevent mold spores from spreading.
- Consult Professionals: If the mold contamination is extensive (over 10 square feet) or you're unsure about handling it, call in a professional mold remediation specialist for help.
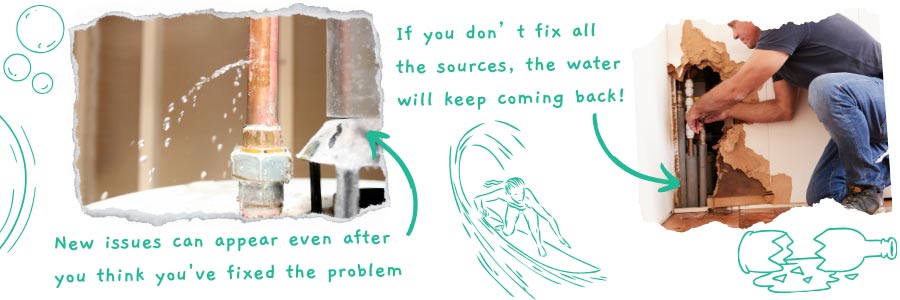
Issue #2: A Water Source Has Not Been Addressed
Starting restoration without addressing all the causes of water loss is like bailing out a sinking ship without plugging the hole. Water damage can come from various sources, like leaking pipes, faulty appliances, or roof leaks, and new issues can appear even after you think you've fixed the problem. If you don’t tackle the source of the water, the problem will keep coming back.
Steps to Address:
- Alert the Homeowner and Management: Let them know about the unresolved water source so everyone is aware.
- Identify and Stop the Leak: Inspect the plumbing, roofing, or appliances to determine where the water is coming from. If necessary, shut off the water supply and repair any leaks or replace damaged components.
- Call a Plumber: If you can't pinpoint the leak or need specialized repair, bring in a plumber to assess and fix the issue.
Issue #3: Initial Scope Not Complete - Needs Additional Work
Sometimes, the initial scope of work doesn't cover everything, and new issues pop up as the project progresses. Water damage is often more extensive than it first appears, so it's essential to reassess continually and ensure no stone is left unturned.
Steps to Address:
- Alert the Homeowner and Management: Inform them that more work is needed beyond the original scope.
- Review and Inspect: Revisit the initial scope and conduct a detailed inspection to spot any areas that need further attention.
- Address Outstanding Tasks: Ensure all necessary tasks are completed to keep the project on track and avoid delays or complications.
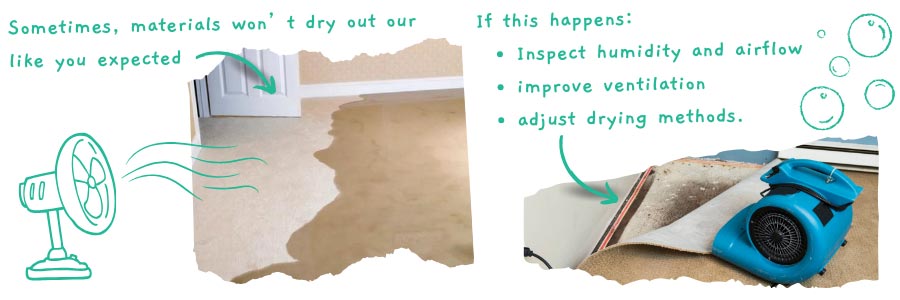
Issue #4: Material Not Drying
Sometimes, despite your best efforts, materials just won't dry out. High humidity, poor airflow, or insufficient drying time can all be culprits, but proper drying is essential to prevent mold growth and structural damage.
Steps to Address:
- Inspect the Area: Determine why the materials aren't drying. Check for high humidity, poor airflow, or other factors that could be hindering the process.
- Improve Ventilation: Boost airflow by opening windows or using fans. Make sure dehumidifiers and other drying equipment are working correctly.
- Adjust Drying Strategy: Reassess and tweak your drying strategy to ensure all materials dry completely.
Issue #5: Homeowner Not Home for Appointment
Life happens, and sometimes homeowners miss scheduled appointments, which can disrupt your plans. It's important to be understanding of the client and handle these situations with effective communication and flexibility to keep the project on track
Steps to Address:
- Contact the Homeowner: Call or email them to let them know you missed the appointment and to reschedule.
- Reschedule: Find a new time that works for both parties. Make sure to account for their availability and any constraints.
- Document Communication: Keep a record of all interactions to prevent misunderstandings.
- Adjust Project Timeline: Update the timeline to reflect the new appointment and ensure subsequent tasks aren't delayed.
Issue #6: Homeowner Has Turned Off or Unplugged Equipment
Sometimes, homeowners might unplug equipment due to noise, misunderstanding its importance, or energy concerns. Because continuous operation is essential for effective drying and mold prevention, it's crucial to communicate this clearly and monitor the equipment regularly to ensure it stays on.
Steps to Address:
- Explain the Importance: Educate the homeowner on why the equipment needs to stay on, highlighting the potential consequences of turning it off, like prolonged drying times and increased mold risk.
- Provide Instructions: Clearly explain how to operate the equipment and stress the importance of continuous operation.
- Remind and Address Concerns: If the equipment is off, gently remind the homeowner to keep it running and address any concerns they may have.
Issue #7: Employee Injury
Injuries on the job can disrupt the project and seriously impact your team's safety and morale. Water mitigation job sites have many hazards, like as slippery surfaces, electrical risks, and heavy equipment. Knowing the emergency procedures like the back of your hand ensures a quick response, proper documentation, and effective management of workplace injuries, safeguarding everyone's well-being.
Steps to Address:
- Notify Supervisor: Immediately inform your supervisor about the injury.
- Provide First Aid: Administer any necessary first aid or medical assistance on-site.
- Follow Protocols: Adhere to company procedures for reporting and documenting injuries.
- Secure Medical Treatment: Make sure the injured employee gets the medical care they need and support them through their recovery.
Now that you know the most common issues you'll encounter during water mitigation, you're better equipped to handle whatever comes your way. From unexpected mold to elusive leaks and everything in between, being prepared means you can tackle these challenges head-on and keep your projects on track. It also means you can better communicate with and reassure homeowners, too.
But let’s face it, remembering every detail can be tough, especially when you're in the thick of a job. That’s where KnowHow comes in. With KnowHow’s platform, you have instant access to real-time support, comprehensive training, and detailed SOPs right at your fingertips. This means you can find answers on the fly, ensure every team member is up to speed, and handle any situation with confidence.
So, don’t let the unexpected throw you off course. Equip your team with KnowHow and elevate your restoration process to new heights. Visit tryknowhow.com to discover how KnowHow can make every step of your water mitigation project smoother and more efficient.
Looking for a reprint of this article?
From high-res PDFs to custom plaques, order your copy today!


